

Happy Makeup Monday Ladies!
Today I will be sharing the first of my many Glam Lessons to come online with you all of some the Beauty Industry’s best kept secrets! Today’s focus is on contouring and concealing. The perfect complexion is key to any makeup routine, and today we will look at how a glowing complexion can enhance your entire look!
Hair and Makeup for this look glam evening look created by: Mitasha @MakeupbyMitasha


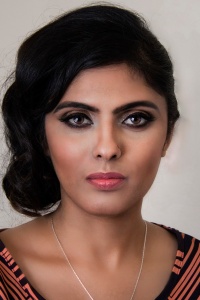
Photography for Reet’s Evening Out Look By: Harsh Chahal
The process pictured above is a very basic model of contour and highlight. There are many methods and patterns you can use to give your face a more sculpted 3-dimensional look, but for beginners, its best to start with a very simple outline until you get the hang of it and see the results!
Step By Step Process:
Step 1: Apply your eyes and brows before staring the face.
Step 2: Prep Your Skin!
Step 3: Apply your favorite foundation evenly over the skin in a light layer
Step 5: Get your light colored cream/concealer. Apply to the following areas: Under eyes, between brows, down nose, under cheekbone, on chin and upper lip. Highlighting the face with a lighter shade brings that portion of the face outwards and becomes more noticeable.
Step 6: Apply your dark colored cream concealer. Apply to the following areas: Entire jaw line, hollows of cheeks, sides of nose, entire hair line and temples. Contouring the face with the darker shade gives your face definition as it brings that portion of the face inwards to become less noticeable by creating a shadow-affect.
Step 7: After you have applied the cream shades in the proper areas of the face, its time to blend! A phrase I learned from my Instructor at Ash Kumar Academy of Hair and Makeup from UK, that always comes to my mind is “Blend blend, blend is your friend.” Always remember ladies, even if you have put too much of the dark or the light, all you have to do is blend it out! Blending the colors together on your skin will soften the edges and remove excess product from the face.
Step 8: Don’t forget to apply powder over your cream contour and highlight areas! This part is one of the most important steps as it seals the colors to your skin and keeps you looking fresh for hours to come! I like to use my Anastasia Contour palette to set my creams using the lightest shades in the highlight areas and darker shaded in the contour areas.
Step 9: Apply your cheeks and lips! And your look is complete!
- Expert tip: After blending, if you feel you are not looking even, or are too dark or too light,in certain areas, its okay to take a little extra of the opposite shade and fix the look until you have the perfect soft definition and highlight. I normally color correct like this with my powder palette as blending powders on the skin over your base will give you a more clean and blended look without looking muddy! 😉


Products Used to create Reet’s Look:
Face…
Brushes used: Morphe Brushes
Face Primer: Smashbox Photo Finish Primer in Original
Contour cream: Anastasia Contour Kit- medium
Face Foundation: MAC Cosmetics Face and Body Foundation
Powder: Anastasia Beverly Hills Contour Book
Under eyes: Graftobian HD Glamour Palette
Blush: MAC Blush in Peaches
Highlight: Hourglass Ambient Light “Ethereal”
Eyes…
Eye base: MAC Paint Pot in Layin’ Low
Shadows: Morphe Brushes 35W Warm Color Palette
Liner: Stilla Stay All Day Waterproof Liquid Eyeline
Mascara: Lancôme Hypnose Drama
Brow reshaping: Anastasia BH Brow Pomade in Brunette & duo powder to add color
Lips…
Liner, Lip stain, Lip-gloss
Anastasia Liquid Lips in Retro Coral
MAC Lip Glass in Nymphette
I hope you all enjoyed my tips and products details!
XoXo
-Mitasha @Makeupbymitasha!
